Express coffee -- the Aeropress way
 In over 25 years of playing with coffee and espresso brewers and machines, I thought I had seen it all. Over the last few years I have come to accept the fact that, at best, coffee is a messy process that takes time. My time... and lots of it. The readers at CoffeeCrew will agree - Coffee and espresso is a hobby that, like home or a boat ownership, becomes a money pit after a while. All you can do to get a better experience is spend more on a machine or grinder.
This was a good time for a wake-up call.
Consider this, a good cup of coffee is really about fresh basic ingredients - coffee and water (heated to the right temperature), infused for the right amount of time... and consumed. Simple huh?
According to the Aeropress website, the Aeropress is the result of several years of applied research by inventor/engineer Alan Adler. Adler has about forty U.S. patents and an equal number of foreign patents. He is President of Aerobie, Inc, Palo Alto, California and a lecturer in mechanical engineering at Stanford University. Adler's best-known invention is the Aerobie flying ring which set the Guinness World record for the world's farthest throw (1,333 feet).
Flying rings huh? The Aeropress is the classic "Why did'nt I think of this" scenarios. Not complaining mind you. Truth be told, I have always been open to something new, easier and exciting. I guess the time has come.
Open the Box
The Aeropress coffee maker comes in a light duty box that was, oddly, reminiscent of something you would buy in the hardware section of your grocers shelves - colourful and eye catching like something from the K-Tel gadget era. Cool. This works for me.
There are seven parts to all of this kit, including a years supply of filters. The brew kit includes a sturdy plastic (and calibrated) brew column, a rubber-ended plunger (that doubles as a measuring cup), a hopper that fits over the top of the brewing column, a filter holder (which locks in place at the bottom of the brew column), a stir paddle and a selection of several hundred paper filters.
Oh yes, there is a scoop - there is always a scoop!
Eveything is lightly packaged (thereby reducing shipping costs) because this is all space-age plastics - little or nothing to crush or destroy.
Any Missing bits?
This item came with a thorough fold-out instruction sheet that was clear. So clear, in fact, that I read half of it before it became abundantly clear what I needed to do.
This must be a guy thing.
Their website reveals quite a few a-list testimonials -- including the likes of Kenneth Davids, World reknowned coffee writer, lecturer and consumer advocate. Testimonials... Kenneth Davids? Really?! Excellent.
The drastic plastic
The Aeropress package consists of a brew column (at least that is what I am calling it), a plunger, ground coffee hopper, scoop, filter holder, a years worth of filters and a large stir-stick.
A turn or two of the instructions seem to indicate that 'any grind will do' but knowing coffee the way I do, it's best to stick to the tried and true before you go off on a limb.
I opted for coffee ground for drip.
In preparing for the first and subsequent brew sessions (with the Aeropress), I boiled up a kettle of water and pre-heated a coffee mug. First discovery: The Aeropress assembly fits perfectly over most mugs. This never occured to me but most coffee mugs, at least on appearances, have the exact same diameter.
Using the Aeropress involves some 'armstrong' so make sure your coffee mug (or glass) is on a solid surface and that there are no cracks in your mug. Considering that you will be applying 7 to 15 pounds of pressure (continuously for up to 20s) you had better make sure that nothing is going to fall apart or split.
A measure of success
The Aeropress has calibrations for the amount of water to use and clear instructions on how much coffee to use - It does, after all, come with a scoop. As usual, I ignore the instructions and use however much coffee I want. Within reason of course!
The instructions stipulate a water temperature that is way too low - 165 to 175 degrees (F) or 75 to 80 degrees (C) - too low! The instructions state a lower brewing temperture makes a smoother brew. Right. Ok. The guy that designed this might know how to design a flying disk that sails 1300 feet but I know coffee - You readers know coffee too and the ideal brewing temperature for coffee is 196 to 204 degrees (F) or just shy of 100 degrees (C)
 |
 |
 |
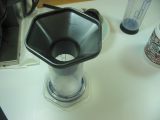
Hopper helper
|
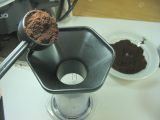
Scooping
|
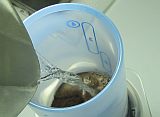
Hot, hot water
|
The steps to good coffee with the Aeropress move along very quickly so it is good to have everything handy. So far we have the coffee and hot water ready. It might help to splash the bits and pieces with hot water (at least the ones that come in contact with the coffee). And the steps are:
- Have filter holder handy. Get paper filter from paper filter supply.
- Put a paper filter into the filter holder and screw into base of brew column.
- Place the brew column on top of a mug, preferably one with out cracks or stress fractures!
- Put ground coffee into the brew column - 1 to 4 scoops. Hey, experiment!
- Use drip grind to start because it means less resistance when you start pushing.
- Note the funnel-hopper above. Use it. It makes loading the coffee much easier!
- The plunger doubles as a measuring cup (it is calibrated after all) - I just pour water from the kettle
- Wet the coffee if you are so inclined - wetting enhances extraction... apparently.
- Stir for about 10 or 15 seconds
- Wet the rubber seal on the plunger and insert plunger into brew column.
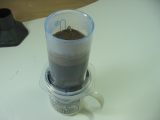
- Press steadily until you bottom out. Stop!
- Lift apparatus from mug and enjoy coffee.
Coffee in the bar (pressure)!
My very first impression with the Aeropress was surprise. The first brew was a good one. I used an espresso blend (randomly chosen from the selection I had) and it was not roaster fresh. It tasted like stove-top espresso with a bit of an edge.
True espresso coffee, as we know, takes 9 atmospheres of pressure and beyond.
Anything less is not espresso. I will be doing more extensive tests with the Aeropress using finer grinds of coffee (in the espresso range) so I will not comment until those tests are complete. (Yes, so far I have seen wisps of something like crema.)
Again, initial impressions are - this is mighty fine pressure brewed coffee!
Where would one really want to have one of these?
Well -- in my kitchen! Other prime locations would be camping, travel, the office and anywhere else you would want quality coffee with very portable accessories! All you need is coffee and a supply of hot water. Color me impressed.
 |
 |
 |
Top it up
|
Take the plunge
|
Pass the puck
|
In closing
The Aeropress represents the very best in simplicity married to space age plastics mated with modern thinking. We have (obviously) come a long way in the sub-50 dollar coffee maker so this one comes across with top marks. I broke my old record for making a tasty cup fast! This exercise clocks in at mere minutes once you have everything ready. Clean up is, as they say, a breeze! Brew your coffee and knock a fairly dry puck into the rubbish. Brew what you need when you need. Brilliant! Top marks.
Credits - As usual, many, many thanks go out to Reg James at EspressoTec.Com for this coffee maker as well as Alex Tennant of Aerobie and Kyra Kennedy of Baratza. Again, thanks! Aeropress is available in Victoria at Mirage Cafes, Vancouver at EspressoTec.Com and other prefered vendors of quality coffee!
Colin Newell lives and works in Victoria B.C. at a local University. His love of coffee began at the age of 15. He had his first espresso-cappuccino at age 19 and has never looked back. The CoffeeCrew website has been on the air profiling cafe culture and consumer issues for the coffee lover since the Spring of 1994.